Monitoring and controlling Qlik Replicate tasks
Before you can create a Compose project, you need to define a Replicate task that replicates the relevant source tables from the source database to the landing zone. You can define a different task for each project or the same task can serve several projects.
Monitoring and controlling Replicate tasks from within Compose involves the following steps:
- Step 1: Configure Compose to connect to the Replicate machine
- Step 2: Add the Replicate task to the data source settings
- Step 3: Monitor and control the Replicate task
Step 1: Configure Compose to connect to the Replicate machine
-
Open the Manage Replicate Servers window using any of the following methods:
-
From the Management drop-down menu in the main toolbar, select Manage Replicate Servers.
-
In the New Data Source window, click the Replicate Server Settings link below the Associate with Replicate task field.
The Manage Replicate Servers window opens.
-
-
Click Add Replicate Server.
The Add Server window opens.
-
Enter the following information:
- Name: A display name for the server.
- Description: (Optional) A description for the server.
-
Host: The IP address or host name of the Qlik Replicate machine.
Information noteWhen Replicate Server is installed on Linux, enter the IP address of the Windows machine on which the Replicate UI Server is running.
- Port: Optionally, change the default port (443). You should only change the default port if you are certain that a different SSL port is being used.
-
User Name and Password: Your credentials for logging in to the Qlik Replicate machine.
Information noteWhen Replicate Server is installed on Linux, enter the user name and password for the Windows machine on which the Replicate UI Server is running.
-
Get metadata timeout - The time to wait when discovering a task’s source database or refreshing the metadata cache before returning a timeout error.
-
Get task timeout - The time to wait when starting a Replicate task before returning a timeout error.
Information noteIn environments with complex networks, operations related to Replicate may exceed the default timeout limit. If you experience frequent timeouts starting tasks, discovering a task’s source database, or refreshing the metadata cache, increasing these values may help.
-
Click Test Connection and then click OK if the connection is successfully verified.
The server is added to the Manage Replicate Servers window. Click Close to close the window.
Step 2: Add the Replicate task to the data source settings
- Open the New Data Source or Edit Data Source: <Name> window as described in Defining landing zones.
-
Click the browse button to the right of the Associate with Replicate task field.
The Select Replicate Task window opens.
-
Select a Replicate Server from the Server drop-down list.
The Replicate Tasks list is populated with all tasks defined on the selected server.
- Select the task that is replicating the source tables to the landing zone and then click OK.
-
If you want to discover source database for model generation, select Source database connection and then configure the settings as described in Defining Replicate data source connections.
-
When you're done, click OK again to save the data source settings.
The Replicate task is immediately added to the Compose monitor.
Step 3: Monitor and control the Replicate task
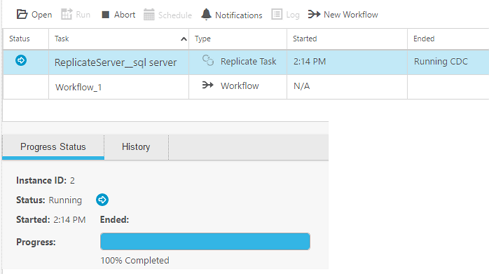
The example below shows how the Replicate task appears in the Compose Monitor. You can start and stop the Replicate task using the Abort and Run toolbar buttons. To view and edit the task on Replicate Server, click Open.

If a task is stopped from within Replicate, the task status in Compose will be "Completed" instead of "Aborted".
You can also define notifications for the task and add the task to a workflow. For more information, see Notifications and Workflows respectively.
The monitor provides various information about the task. For details, see Viewing information in the monitor.
